Why it is built this way
-
Start from the board you can find anywhere
The first prototypes ran on an Arduino Uno: cheap, documented to death and sold almost everywhere. If you can get one, you can learn to build a synthesiser.
-
Then one step up: the Leonardo
The Leonardo is an Uno++: same size, same headers, same price range. Its chip, the ATmega32u4, speaks USB natively, so your computer sees it as a MIDI device with no drivers and no extra firmware. The same hardware is a synthesiser on its own and a MIDI controller for any music software.
-
Use every pin
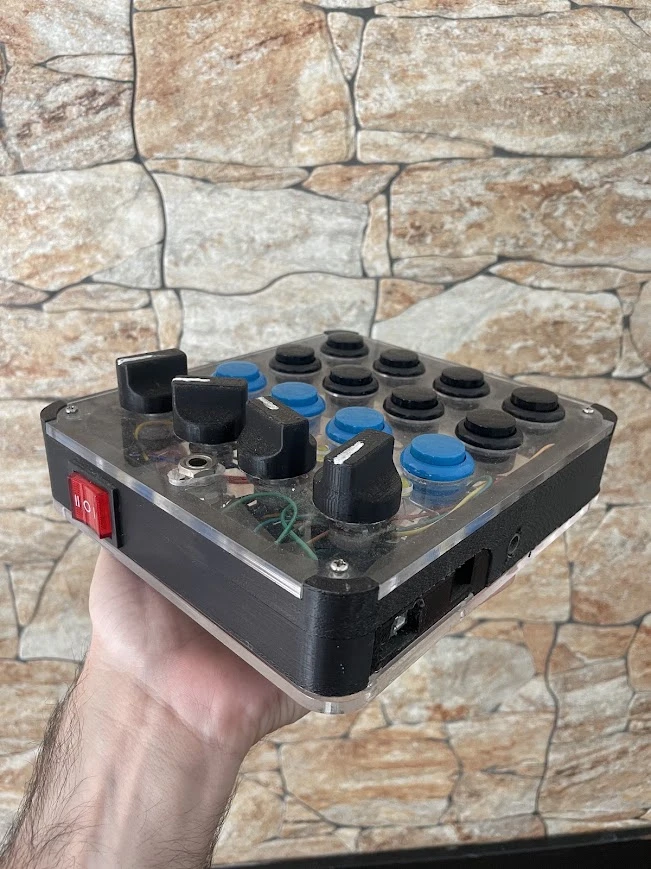
Twelve buttons on seven pins with a diode matrix. Four LEDs on three pins with charlieplexing. A three position switch on two pins. Audio straight out of a PWM pin, with no DAC. One input jack that reads audio, control voltage or a footswitch. Of the 18 pins you can safely use, all 18 have a job.
-
Leave two pins alone
D0 and D1 picked up interference on the bench whenever the board was connected over USB, so they stay free. That is why the count is 18, not 20.
-
Fixed hardware, open code
The layout never changes, so every sketch runs on every LeoSynth. The library reads the buttons, smooths the knobs and drives the LEDs; you only write the sound. Everything is public domain.
- Button matrix
- LEDs
- Audio out
- Mode switch
- Knobs
- Input jack
- Free
| Pins | Job | Trick |
|---|---|---|
| D10 D11 D12 | Matrix rows | 3 × 4 matrix: 12 buttons on 7 pins |
| D5 D6 D7 D8 | Matrix columns | |
| D2 D3 D4 | LEDs | Charlieplexing: 4 LEDs on 3 pins |
| D9 | Audio out | PWM through a small filter, no DAC |
| D13 A0 | Mode switch | Two bits encode three positions |
| A1 A2 A3 A4 | Knobs | Smoothed by the library |
| A5 | Input jack | Analogue or digital: audio, CV or footswitch |
| D0 D1 | Free | Kept clear of USB interference |
The build
Every step leaves something working, and every step has a test. Do not move on until the test passes.
- 0What you need
- 1The brain
- 2The voiceSoon
- 3Twelve buttonsSoon
- 4Four knobsSoon
- 5The mode switchSoon
- 6Four LEDsSoon
- 7The input jackSoon
- 8The caseSoon
- 9PlaySoon
What you need
Standard parts, all of them. Any electronics shop or online marketplace will have them.
- 1×Arduino LeonardoOr a compatible clone, plus a micro USB cable
- 12×Arcade push buttonMomentary. 4 for controls, 8 for pads
- 12×Diode 1N4148One per button, so presses never ghost
- 4×Potentiometer 10 kΩLinear (B10K), with knobs
- 4×LED3 or 5 mm, one per column
- 1×Rocker switchON-OFF-ON, three positions
- 2×Jack 6.35 mmMono guitar jack: one in, one out
- 1+1Output filter1 kΩ resistor and 10 nF capacitor
- SomeHook-up wirePlus heat shrink and solder
- 1×CaseA 3D printed frame between two acrylic plates, or any box that fits
Tools
- Soldering iron and solder
- Wire stripper and side cutters
- Drill with a step bit, for the panel holes
- A computer with a USB port
- A multimeter helps, but is optional
The brain
Before touching a single wire, make sure the board, the cable and the software talk to each other.
- Install the Arduino IDE from arduino.cc/en/software. It is free.
- Download the LeoSynth library:
LeoSynth.zip library and example sketches
In the IDE, go to Sketch → Include Library → Add .ZIP Library… and pick the file. - Plug the Leonardo into the computer. Choose Tools → Board → Arduino Leonardo and Tools → Port with the port that names the Leonardo.
- Paste this sketch and press Upload.
// LeoSynth, step 1: the brain is alive.
// If this line fails, the library
// is not installed.
#include <LeoSynth.h>

void setup() {
  pinMode(LED_BUILTIN, OUTPUT);
  Serial.begin(9600);
}

void loop() {
  digitalWrite(LED_BUILTIN, HIGH);
  delay(500);
  digitalWrite(LED_BUILTIN, LOW);
  delay(500);
  Serial.println("LeoSynth: alive");
}Test
- The small LED marked L on the board blinks once a second.
- Tools → Serial Monitor prints
LeoSynth: alive. - File → Examples → LeoSynth lists the example sketches.
Why this step matters. This USB cable is the reason for the Leonardo. Later it will carry MIDI to your computer with no drivers at all; right now it proves the whole chain works before any soldering.